MS Windows XP SP3 설치 후 자동업데이트를 하면 업데이트 오류가 날 때가 있습니다. 이때 컴퓨터를 재부팅 해도 반복되는 업데이트 실패... 많은 분들이 이문제를 위해 업데이트 파일을 수동으로 다운로드 받아서 업데이트를 적용시키는 것을 보았습니다. 이 문제를 해결하는 팁을 알려드립니다 아래 절차를 따라해보세요.
[시작] 메뉴 → [실행] 클릭.
실행 창이 열리면, [열기]입력란에 cmd 입력 후 확인버튼 클릭.
cmd 창이 열리면 「 net stop wuauserv 」입력 후 엔터. 엔터 후 cmd 창에 아래와 같은 메세지가 출력된다.
자동 업데이트 서비스를 멈춥니다.
자동 업데이트 서비스를 잘 멈추었습니다.
다음에는「 regsvr32 %windir%\system32\wups2.dll 」입력 후 엔터 엔터 후 아래와 같은 팝업창이 뜬다.
C:\WINDOWS\system32\wups2.dll의 DllRegisterServer 성공 여기서 확인 버튼을 클릭.
다음에는「 net start wuauserv 」입력 후 엔터 엔터 후 cmd 창에 아래와 같은 메세지가 출력된다.
MS Winodws XP를 사용하다가 OS를 재설치 할 때, 저와 같이 바탕화면에 여러가지 파일들을 저장해 놓으신 분들은 C:\Documents and Settings\ 의 사용자 폴더 안에 있는 바탕 화면 폴더를 다른 로컬 드라이브에 백업을 하실 겁니다. 이와 같은 번거로움을 조금이나마 해소하기 위한 팁을 소개합니다.
그림 1. 너저분한 바탕화면의 예. 바탕화면에 동영상등의 파일들이 있으면, 백업하기 더 귀찮아진다.
"내 문서" 같은 경우, 그림 2. 와 같이 C 드라이브가 아닌 다른 로컬 드라이블에 있는 폴더로 지정하여 OS 재설치 시 비교적 빠르게 백업 및 복구가 가능합니다.
그림 2. 내 문서 등록 정보에서 수정할수 있는 내문서의 대상 폴더 위치.
하지만 바탕화면은? 위와 같은 비교적 손쉬운 방법은 잘 모르겠습니다만, 레지스트리 편집을 통해 다른 로컬 드라이브로 지정이 가능합니다. 방법은 다음과 같습니다.
시작 → 실행 → regedit
그림 3. 과 같이 아래 항목을 찾는다. HKEY_CURRENT_USER\Software\Microsoft\Windows\CurrentVersion\Explorer\User Shell Folders\Desktop
Desktop 의 Data 값을 %USERPROFILE%\Desktop 에서 D:\Desktop으로 바꾼다.
그림 3. 레지스트리 편집기를 통한 바탕화면 폴더 경로 변경
이와 같은 방식으로 Favorites (즐겨찾기), Personal (내문서), My Pictures, 등의 폴더 경로를 바꿔줄 수 있습니다.
You can configure synergy to start automatically when the computer starts or when you log in. The steps to do that are different on each platform. Note that changing these configurations doesn't actually start or stop synergy. The changes take effect the next time you start your computer or log in.
Windows
Start synergy and click the Configure... button by the text Automatic Startup. The Auto Start dialog will pop up. If an error occurs then correct the problem and click Configure again.
On the Auto Start dialog you'll configure synergy to start or not start automatically when the computer starts or when you log in. You need Administrator access rights to start synergy automatically when the computer starts. The dialog will let you know if you have sufficient permission.
If synergy is already configured to automatically start then there will be two Uninstall buttons, at most one of which is enabled. Click the enabled button, if any, to tell synergy to not start automatically.
If synergy is not configured to start automatically then there will be two Install buttons. If you have sufficient permission to have synergy start automatically when the computer does then the Install button in the When Computer Starts box will be enabled. Click it to have synergy start for all users when the computer starts. In this case, synergy will be available during the login screen. Otherwise, click the Install button in the When You Log In box to have synergy automatically start when you log in.
Unix
Synergy requires an X server. That means a server must be running and synergy must be authorized to connect to that server. It's best to have the display manager start synergy. You'll need the necessary (probably root) permission to modify the display manager configuration files. If you don't have that permission you can start synergy after logging in via the .xsession file.
Typically, you need to edit three script files. The first file will start synergy before a user logs in, the second will kill that copy of synergy, and the third will start it again after the user logs in.
The contents of the scripts varies greatly between systems so there's no one definite place where you should insert your edits. However, these scripts often exit before reaching the bottom so put the edits near the top of the script.
The location and names of these files depend on the operating system and display manager you're using. A good guess for the location is /etc/X11. If you use kdm then try looking in /etc/kde3 or /usr/kde/version/share/config. Typical file names are:
xdm
kdm
gdm
1
xdm/Xsetup
kdm/Xsetup
gdm/Init/Default (*)
2
xdm/Xstartup
kdm/Xstartup
gdm/PostLogin/Default (*)
3
xdm/Xsession
kdm/Xsession
gdm/Sessions/Default (*, **)
*) The Default file is used if no other suitable file is found. gdm will try displayname (e.g. :0) and hostname (e.g. somehost), in that order, before and instead of Default. **) gdm may use gdm/Xsession, xdm/Xsession or dm/Xsession if gdm/Sessions/Default doesn't exist.
For a synergy client, add the following to the first file: /usr/bin/killall synergyc sleep 1 /usr/bin/synergyc [<options>] synergy-server-hostnameOf course, the path to synergyc depends on where you installed it so adjust as necessary.
Add to the second file: /usr/bin/killall synergyc sleep 1
And to the third file: /usr/bin/killall synergyc sleep 1 /usr/bin/synergyc [<options>]synergy-server-hostnameNote that <options> must not include -f or --no-daemon or the script will never exit and you won't be able to log in.
The changes are the same for the synergy server except replace synergyc with synergys and use the appropriate synergys command line options. Note that the first script is run as root so synergys will look for the configuration file in root's home directory then in /etc. Make sure it exists in one of those places or use the --config config-pathname option to specify its location.
Note that some display managers (xdm and kdm, but not gdm) grab the keyboard and do not release it until the user logs in for security reasons. This prevents a synergy server from sharing the mouse and keyboard until the user logs in. It doesn't prevent a synergy client from synthesizing mouse and keyboard input, though.
If you're configuring synergy to start only after you log in then edit your .xsession file. Add just what you would add to the third file above.
Mac OS X
[By Tor Slettnes]
There are three different ways to automatically start Synergy (client or server) on Mac OS X:
The first method involves creating a StartupItem at the system level, which is executed when the machine starts up or shuts down. This script will run in the background, and relaunch synergy as needed.
Pros:
Synergy is persistent, so this allows for a multi-user setup and interactive logins.
Cons:
The synergy process does not have access to the clipboard of the logged-in user.
The second method will launch Synergy from the LoginWindow application, once a particular user has logged in.
Pros:
The synergy process inherits the $SECURITYSESSIONID environment variable, and therefore copy/paste works.
Cons:
Once the user logs out, synergy dies, and no remote control is possible.
The third method is to launch a startup script from the "Startup Items" tab under System Preferences -> Accounts.
Pros:
Does not require root (Administrator) access
Cons:
Once the user logs out, synergy dies, and no remote control is possible.
The text below describes how to implement a Synergy client using the first two methods simultaneously. This way, Synergy is always running, and the clipboard is available when someone is logged in. A Mac OS X Synergy server setup will be quite similar.
1. Create a System Level Startup Item
Open a Terminal window, and become root: $ sudo su -
Create a folder for this item: # mkdir -p /Library/StartupItems/Synergy
In this folder, create a new script file by the same name as the directory itself, Synergy. This script should contain the following text:
However, replace synergy-server with the actual name or IP address of your Synergy server.
Note that this scripts takes care not to start Synergy if another instance is currently running. This allows it to run in the background even when synergy is also started independently, e.g. from the LoginWindow application as described below.
Make this script executable: # chmod 755 /Library/StartupItems/Synergy/Synergy
In the same folder, create a file named StartupParameters.plist containing:
That's it! If you want to test this setup, you can run the startup script as follows:
# /Library/StartupItems/Synergy/Synergy start
Any errors, as well as output from Synergy, will be shown in your terminal window.
Next time you reboot, Synergy should start automatically.
2. Run Synergy When a User Logs In
Each time a user successfully logs in via the console, the LoginWindow application creates a unique session cookie and stores it in the environment variable $SECURITYSESSIONID. For copy and paste operations to work, Synergy needs access to this environment variable. In other words, Synergy needs to be launched (directly or indirectly) via the LoginWindow application.
However, in order to kill any synergy processes started at the system level (as described above), we need root access. Thus, launching Synergy within the User's environment (e.g. via the Startup Items tab in System Preferences -> Accounts) is not an option that work in conjunction with the method above.
Fortunately, the LoginWindow application provides a "hook" for running a custom program (as root, with the username provided as the first and only argument) once a user has authenticated, but before the user is logged in.
Unfortunately, only one such hook is available. If you have already installed a Login Hook, you may need to add the text from below to your existing script, rather than creating a new one.
Launch a Terminal window, and become root: $ sudo su -
Find out if a LoginHook already exists: # defaults read com.apple.loginwindow LoginHook This will either show the full path to a script or executable file, or the text: The domain/default pair of (com.apple.loginwindow, LoginHook) does not exist In the former case, you need to modify your existing script, and/or create a "superscript" which in turn calls your existing script plus the one we will create here.
The rest of this text assumes that this item did not already exist, and that we will create a new script.
Create a folder in which we will store our custom startup script: # mkdir -p /Library/LoginWindow
In this folder, create a new script file (let's name it LoginHook.sh), containing the following text:
#!/bin/sh prog=(/usr/local/bin/synergyc -n $(hostname -s) ip-address-of-server) ### Stop any currently running Synergy client killall ${prog[0]##*/} ### Start the new client exec "${prog[@]}"
Make this script executable: # chmod 755 /Library/LoginWindow/LoginHook.sh
Create a login hook to call the script you just created: # defaults write com.apple.loginwindow LoginHook /Library/LoginWindow/LoginHook.sh
More information on setting up login hooks can be found at Apple.
When running the Synergy client, you may need to use the IP address of the Synergy server rather than its host name. Specifically, unless you have listed the server in your local /etc/hosts file or in your local NetInfo database, name services (i.e. DNS) may not yet be available by the time you log in after power-up. synergyc will quit if it cannot resolve the server name.
(This is not an issue with the previous method, because the StartupParameters.plist file specifies that this script should not be run until "network" is available).
3. Good Luck!
Remember to look in your system log on both your server and your client(s) for clues to any problems you may have (/var/log/system.log on your OS X box, typically /var/log/syslog on Linux boxes).
[압축할 때] tar cvzf 파일명.tar.gz <디렉토리> 또는 파일
[압축 해제] tar xvzf 파일명.tar.gz
[예제]
tar -xvf foo.tar : foo.tar 파일을 푼다.
tar -xvzf foo.tar.gz : gzip으로 압축된 foo.tar.gz 파일을 푼다.
tar -cvf foo.tar foo/ : foo 디렉토리에 있는 내용물을 foo.tar 파일로 묶는다.
기능 옵션
반드시 아래 옵션들 중 하나가 들어가야 한다.
-A, --catenate, --concatenate : 저장 파일에 tar 파일을 추가한다.
-c, --create : 새 저장 파일을 만든다.
-d, --diff, --compare : 저장 파일 혹은 파일 시스템 간의 다른 점을 찾는다.
--delete : 저장 파일에서 지운다. (자기 테이프에는 쓰면 안됨!)
-r, --append : 저장 파일의 끝에 파일을 덧붙인다.
-t, --list : 저장 파일의 내용 목록을 보여준다.
-u, --update : 저장 파일에 저장된 사본보다 새로운 파일만을 덧붙인다.
-x, --extract, --get : 저장된 것에서 풀어낸다.
부가적인 옵션
--atime-preserve : 덤프된 파일의 접근 시간을 바꾸지 않는다.
-b, --block-size N : 블럭 크기를 N x 512 바이트로 정한다. (기본값 N = 20)
-B, --read-full-blocks : 읽은 만큼 블럭을 재지정한다. (4.2BSD 파이프를 읽기 위함)
-C, --directory DIR : DIR 디렉토리로 바꾸고 작업을 한다.
--checkpoint : 저장 파일을 읽는 동안 디렉토리 이름을 출력한다.
-f, --file [HOSTNAME:]F : 저장 파일 혹은 장치 파일 F에 저장한다.
(기본 "-", 표준입/출력을 나타낸다.)
--force-local : colon 문자가 있더라도 저장 파일을 지역 파일로 처리한다.
-F, --info-script F --new-volume-script F : run script at end of each tape (implies -M)
테이프의 끝에 도달하면 스크립트를 실행한다. (-M 이 포함된다.)
-G, --incremental : 이전 GNU 형식으로 incremental 백업을 만들거나 목록을 보거나 풀어낸다.
-g, --listed-incremental F : 새로운 GNU 형식으로 incremental 백업을 만들거나 목록을 보거나
풀어낸다.
-h, --dereference : 심볼릭 링크를 묶지 않는다. 그것이 가리키는 파일을 묶는다.
-i, --ignore-zeros : 크기가 0인 것은 무시한다. (보통 EOF를 의미한다.)
-j, --bzip2 : bzip2 필터를 사용하여 .bz2 파일을 푼다.
--ignore-failed-read : 읽을 수 없는 파일이 있더라도 종료 코드 0을 출력하지 않는다.
-k, --keep-old-files : 기존에 있는 파일을 유지한다. 파일이 있으면 덮어쓰지 않는다.
-K, --starting-file F : 저장 파일에 있는 파일 F에서부터 시작한다.
-l, --one-file-system : 저장 파일을 만들 때 로컬 파일 시스템 안의 놓는다.
-L, --tape-length N : N * 1024 바이트를 쓴 다음 테이프를 바꾼다.
-m, --modification-time : 파일의 변경 시간 정보를 유지하지 않는다.
-M, --multi-volume : 여러 개로 나눠진 저장 파일로 만들거나 목록을 보거나 풀어낸다.
-N, --after-date DATE, --newer DATE : 주어진 DATE 보다 새로운 파일만 저장한다.
-o, --old-archive, --portability : ANSI 형식 대신 V7 형식으로 저장한다.
-O, --to-stdout : 표준 출력으로 파일들을 풀어낸다.
-p, --same-permissions, --preserve-permissions : 모든 퍼미션 정보를 유지한다.
-P, --absolute-paths : 파일 이름의 맨 앞 `/' 문자를 버리지 않는다.
--preserve : -p 옵션과 -s 옵션을 함께 사용한 것과 같다.
-R, --record-number : 저장 파일의 레코드 번호를 각각의 메시지로 보여준다.
--remove-files : 파일을 저장 파일에 덧붙인 다음 파일을 지운다.
-s, --same-order, --preserve-order : 저장 파일 목록과 똑같은 순서로 풀어낸다.
--same-owner : 같은 사용자 소유권으로 파일들을 풀어낸다.
--numeric-owner : user/group 이름으로 항상 숫자를 사용한다.
-S, --sparse : 듬성한 파일을 효율적으로 다룬다.
-T, --files-from F : 파일 F에서 목록을 읽어 추출하거나 만든다.
--null : -T reads null-terminated names, disable -C -C를 비활성화하고, -T로 읽을 때 null로 끝
나는 이름을 읽는다.
--totals : --create로 만들어진 바이트 총합을 출력한다.
-v, --verbose : 처리중인 파일을 자세하게 보여준다.
-V, --label NAME : 저장 파일의 볼륨 이름을 NAME으로 한다.
--version : tar 프로그램의 버전 정보를 출력한다.
-w, --interactive, --confirmation : 각각을 처리할 때 마다 물어본다.
-W, --verify : attempt to verify the archive after writing it 저장 파일을 쓴 후에 저장 파일을
점검한다.
--exclude=FILE : FILE을 제외한다.
-X, --exclude-from FILE : FILE 목록에 있는 것을 제외한다.
-Z, --compress, --uncompress
compress로 압축하거나 푼다.
-z, --gzip, --ungzip : gzip으로 압축하거나 푼다.
--use-compress-program PROG : PROG로 저장 파일을 다시 처리한다. (PROG은 반드시 -d를 처리해야 한다.)
--block-compress : 테이프에 저장할 때 압축 프로그램의 출력을 막는다.
--rsh-command=CMD : `rsh' 대신 원격 COMMAND를 사용한다. 이 옵션은 표준 `rsh' 대신 원격 장치에 접근
할 수 있는 다른 것(예를 들어, Kerberized `rsh')을 사용하는 사람들을 위해 필요하다.
-[0-7][lmh] : 드라이브와 밀도를 지정한다.
This guide shows you how to set up UltraEdit-32 for use with LaTeX. UltraEdit-32 is not a LaTeX graphical user interface nor a dedicated LaTeX editor, but a powerful text editor with features such as syntax highlighting, user tools, templates, regular expression search and replace, auto-completion, function list, code folding and macros. UltraEdit-32 doesn't provide any symbol repository so you have to be comfortable writing most of the LaTeX code on your own (templates aside).
This guide assumes you have already installed MiKTeX and UltraEdit-32. The screenshots are from version 12.10b of UltraEdit-32.
Adding the user tools
First of all start UltraEdit-32 and go to Advanced > Tool Configuration...
The LaTeX DVI tool
Insert these values into the appropriate fields:
Menu Item Name: Something like LaTeX DVI
Command Line: texify.exe --clean --src --run-viewer "%n.tex" --clean removes all temporary and unneccesary files created during compilation. --src makes the compiler include source file information in the DVI file (to enable inverse search). --run-viewer does exactly that.
Working Directory: %p
Toolbar bitmap/icon (file path): Whatever icon you choose.
Your tool configuration should now look something like this:
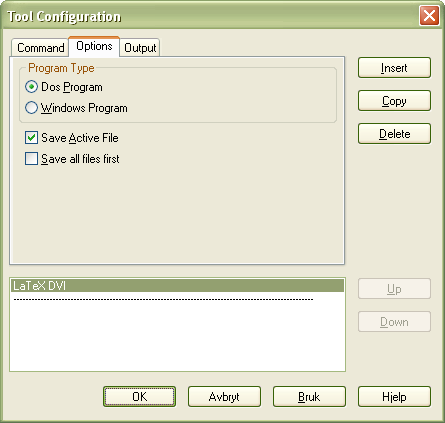
Now, click the tab named 'Options' and make make sure these choices are made:
Program type: Should be 'DOS Program' since texify.exe is a DOS program.
Check 'Save active file'. This option forces UltraEdit-32 to save the file you are working on before it is compiled.
Your configuration should now look like this:
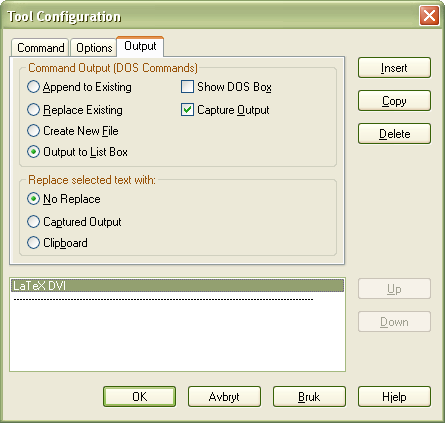
Then, click the tab named 'Output' and make these choices:
Command Output (DOS commands): 'Output to List Box'.
Check 'Cature Output'.
Replace selected text with: 'No Replace'.
Your configuration should look like this:
Click 'Apply' to accept these settings.
Note: The --src option causes YAP to place small gray circles at the beginning of every paragraph.
The LaTeX PDF tool
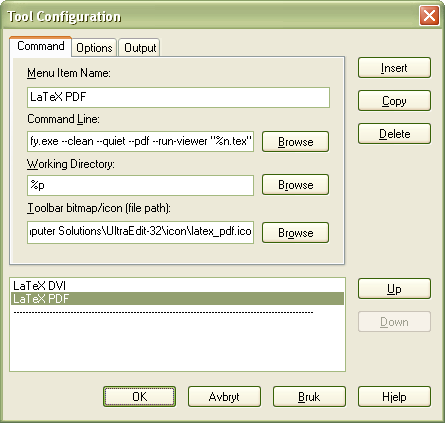
If you want to be able to create PDF files in a jiffy -- add these values to the fields:
Menu Item Name: Something like LaTeX PDF
Command Line: texify.exe --clean --quiet --pdf --run-viewer "%n.tex" --quiet supresses all compiler output. --pdf makes a Word .doc file instead of a DVI. Yeah, right.
Working Directory: %p
Toolbar bitmap/icon (file path): A suitable PDF icon.
Your tool configuration should now look something like this:
The 'Options' and 'Output' tabs should be set up the same way as for the LaTeX DVI Tool.
Click 'Apply' to accept the settings of your new LaTeX PDF tool.
The LaTeX Forward Search tool
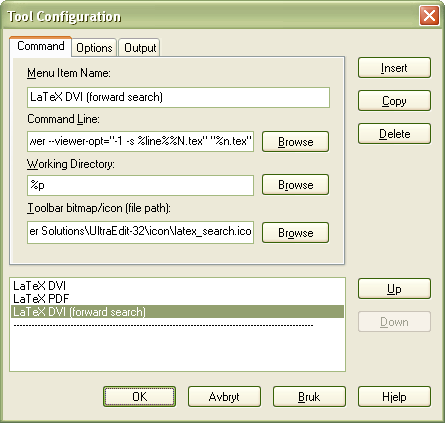
A forward search just means passing along a line number to the DVI viewer thus making it jump directly to the corresponding paragraph in the DVI file. For large documents this feature is isdispensable. To add this tool insert these values into the appropriate fields:
Menu Item Name: Something like LaTeX DVI Forward Search
Command Line: texify.exe --clean --src --run-viewer --viewer-opt="-1 -s %line%%N.tex" "%n.tex" --viewer-opt passes the text between the quotation marks as parameters to the DVI viewer. -1 and -s are parameters understood by the default viewer, YAP.
Working Directory: %p
Toolbar bitmap/icon (file path): Whatever icon you prefer.
Your tool configuration should now look something like this:
The 'Options' and 'Output' tabs should be set up the same way as for the LaTeX DVI Tool.
Click 'Apply' to accept these settings.
You can rearrange the order of the tools using the 'Up' and 'Down' buttons. Note: Be sure to press 'OK' when you're finished or else none of your tools will be saved.
Key Mapping
UltraEdit-32 has already provided your new tools with shortcut keys, but you may want to change them to more sensible ones. Here's how:
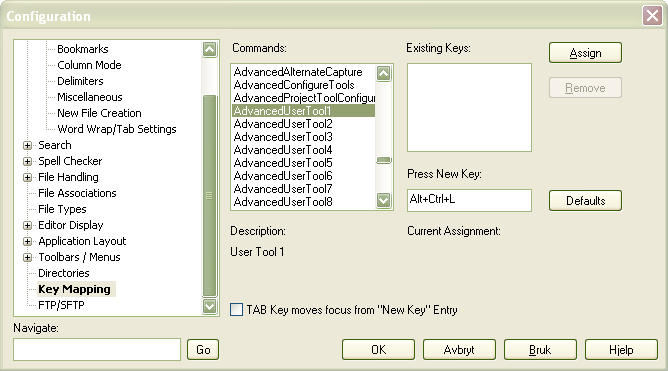
Go to Advanced > Configuration... > Key Mapping.
In the 'Commands' list box select 'AdvancedUserTool1'.
Select 'Ctrl+Shift+1' in the 'Existing Keys' list box and click 'Remove'.
Place the cursor inside the 'Press New Key' field and press a suitable combination. Most of the 'Ctrl+Alt+' combinations are unassigned. If your window now looks similar to this you're well on your way:
Click 'Assign' and then repeat the steps for the rest of your custom tools ('AdvancedUserTool2' and 'AdvancedUserTool3').
Click 'OK' to save your custom Key Mapping.
Adding the tools to the toolbar
You may want to add your new tools to your toolbar. To do this follow these steps:
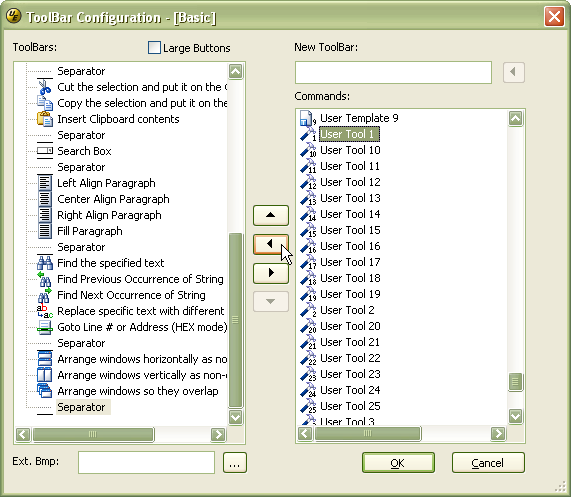
Go to Advanced > Configuration... > Toolbars / Menus > Customization
Click the 'Customize Toolbar' button to open the Toolbar dialog.
In the left list box, scroll down and select the last element in the list.
In the right list box, find and select 'UserTool1' and add it to the Toolbar by clicking the left-arrow button in the middle:
Add 'UserTool2' and 'UserTool3' the same way.
If you want to separate your custom tools from the neighbouring tools on the toolbar, add a separator (found at the top of the list in right list box) the same way as with your tools. Change the order with the up/down arrow buttons in the middle.
Click 'OK' to save your custom toolbar.
Your tools should now appear on the Toolbar. If you can't find them, right-click on any tool and select 'Basic' from the popup menu.
Syntax highlighting
It's a shame and a sin, but UltraEdit-32 does a poor job syntax highlighting LaTeX source. I have contacted IDM requesting support for proper LaTeX syntax highlighting and they replied that the request had been passed on to the developers. There are two wordfiles for LaTeX available at the UltraEdit-32 site, but none of them are any good. I have made some adjustments to the TeX/LaTeX ATT98580 wordfile that are available here. Append the content of this file to the end of your wordfile.txt found in the UltraEdit-32 program directory. As you can see, the first line starts with /L20, indicating that this is language number 20. If you don't already have 19 languages in your wordfile you may want to change this number. If you go to View > View As (Highlighting File Type) you can get the number of the next available language (Language ##). If you haven't added any languages before the number is most likely 12.
Inverse search
The standard DVI viewer, YAP, makes it possible to do inverse searches. This means that you can right click anywhere in the DVI file and by selecting 'Edit TeX Source' be placed near the corresponding paragraph in UltraEdit. To enable this feature follow these steps:
Go to View > Options... > Inverse Search.
Insert this in the 'Command line'-field: uedit32.exe "%f/%l/5" The number 5 indicates that UltraEdit-32 should place the cursor in column 5.
You should now be able to comfortably prepare your LaTeX documents with the power of UltraEdit-32 ready at hand. Please support IDM Computer Solutions, Inc. by buying their product.
LaTeX ('레이텍' 이라고 읽습니다. ) 은 주로 수학자, 과학자, 공학자 들이 많이 쓰는 문서 편집툴입니다. 어떻게 보면 그냥 프로그램 소스 코드를 컴파일 시키는 것 같기도 하고, 어떻게 보면 html 문서랑 비슷하게 생기기도 했습니다. 어쨌든, 이 녀석이 워낙에 막강한 지라, 한 번 쓰기 시작하면 MS Word 류의 오피스 문서 작성기로는 문서를 전혀 작성할 수가 없게 되기도 합니다. (MS Word 를 띄워놓고 있으면 뭘 해야 할지 막막해지기도 하지요)
이런 LaTeX 을 일반 웹사이트에서도 사용하기도 합니다. 예를 들어서, 무언가를 설명을 해야 할 때, 수식이 반드시 필요한 경우가 있습니다. 간단한 덧셈 뺄셈 정도야 a+b 따위로 표현이 가능하지만, 적분, 편미분, 수열 등의 내용들이 들어가버리면, ASCII 문자료 표현이 어려워집니다. 위키피디아의 수학관련 문서들을 보다 보면, 이런 복잡한 수식들이 간단하게 이미지 파일로 작성이 되어 있습니다. 바로 여기서 LaTeX Compiler 가 이용이 된겁니다. 사용자는 LaTeX 문법으로 입력하면, 서버에서 자동으로 그걸 컴파일 해서 이미지를 만들어서 올려주는 겁니다.
이런 편리한 LaTeX 문법을 사용할 수 있는 곳은 그리 많지 않으며, 일반 사용자들을 대상으로 서비스를 하지는 않습니다. 무슨 말인고 하니, 설치형으로는 자신이 셋팅 할 수 있는 여지가 있지만, 분양형 서비스에서는 이런걸 서비스 하지 않더라 이 말입니다. 최근에 베타 테스트에 들어간 "스프링노트" 라는 놈이 문서의 구조화를 내세우며 위키엔진 기반으로 서비스를 하려고 합니다. 문서의 구조화는 LaTeX 도 그 철학이 비슷하기 때문에 잘 맞을 것 같고, 운영자님도 LaTeX Plugin에 대해 언급을 잠깐 하시기도 하셨으니, 한 번 기다려 보지요.
하지만, 그 사이에 LaTeX 을 쓰고 싶은데 놀고만 있을 수는 없으니, 대체할 만한 놈을 한 번 찾아보았습니다.
1. 간단한 LaTeX
http://latex.liveserver.com/에서는 LaTeX 문법을 입력하면 이미지 파일로 바꾸어줍니다. 좋은 것은 이 이미지 파일의 주소가 불변이라는 것입니다. 여기서 입력하고 다른 곳에 포스팅 할 때 가져다 쓰면 될 것 같습니다. 예를 들어서
아는 사람은 알겠지만 앞으로 출시될 윈도우 비스타의 경우 ActiveX 기술을 사용할 수 없다고 한다. 뭐 국내에 악명을 떨치고 있는 문제 중 하나가 이 ActiveX에 기반한 악성코드들이고 보안상으로도 함부로 깔리는 ActiveX 때문에 결국 MS가 손을 땐 것이다.
근데 중요한건 국내 정부, 금융, 포털 사이트들을 보라. 대부분 보안 기술이나 혹은 인증방식, 서비스 제공 과정에서 너무 많이 ActiveX를 사용하고 있다. 예전부터 우리나라의 홈페이지들은 MS의 익스플로러에 의존을 많이했고 사용하는 기술들 또한 MS에 많이 의존했다. 웹표준이 한창 대세가 되어갈때도 우리나라의 대부분은 표준 따윈 개나 줬다. 특히 정부기관의 사이트 일수록 그 형태가 심했다.
지금부터라도 다양한 플렛폼에서 돌아갈 수 있는 웹 환경의 특성을 제대로 살릴 수 있는 방법, 뭐 예를 들면 웹 표준을 지킨 사이트, AJAX같은 기술등 뭔가 의존성을 줄일 수 있는 방법을 연구해야한다.
한데 정부에서는 MS에게 ActiveX 같은 어찌보면 구시대 유물과도 같이 취급될 기술을 요구하고 계속 사용할 방법에만 노력을 하고 있다는 이야기를 들으니 안타깝다. (내 세금!) 기술적으론 사용할 수 있다는 이야기도 있긴한데 이런 일이 계속 일어나지 않게 하기 위해서는 새로운 노력이 필요할 듯 하다.